Platform Introduction Tutorial
This tutorial demonstrates basic operation of the ASKAP Central Processor platform, and does so by walking you through the process of imaging a simulated BETA dataset. The primary goal of this tutorial is to introduce you to the platform and the program execution environment.
The simulated measurement set has the following specifications:
Sky model: SKADS S3SEX Simulated Sky
Array Configuration: BETA (ak01,ak03,ak06,ak08,ak09,ak15)
Observation Length: 12 hours
Correlator integration time: 30s
Number of beams: 36
Polarisations: XX & YY
Number of spectral channels: 304
Channel width: 1MHz
Tsys: 50K
Gains corruption: None
Prerequisites
You should read the Central Processor Platform documentation and in particular have setup your environment per the section entitled “Setting up your account”.
Setting up a working directory
Your working directory will not be within your home directory, instead it will reside on the fast Lustre filesystem:
cd /scratch2/askap/$USER
mkdir introtutorial
cd introtutorial
Retrieving the tutorial dataset
The measurement set used in this tutorial can be found on /group. You can copy it to your local directory:
cp -r /group/askap/askapops/tutorials/basic1 .
cd basic1
You will see a single measurement set named coarse_chan.ms.
Creating a dirty image
Since the measurement set has no calibration errors we can move straight to imaging. First we will produce a dirty image with the cimager program. Create the following configuration file for cimager, lets call it dirty.in:
Cimager.dataset                                 = coarse_chan.ms

# Each worker will read a single channel selection
Cimager.Channels                                = [1, %w]
#
Cimager.Images.Names                            = [image.i.dirty]
Cimager.Images.shape                            = [3328,3328]
Cimager.Images.cellsize                         = [10arcsec,10arcsec]
Cimager.Images.image.i.dirty.frequency          = [1.270e9,1.270e9]
Cimager.Images.image.i.dirty.nchan              = 1
Cimager.Images.image.i.dirty.direction          = [12h30m00.00, -45.00.00.00, J2000]
#
Cimager.gridder.snapshotimaging                 = true
Cimager.gridder.snapshotimaging.wtolerance      = 1000
Cimager.gridder                                 = AWProject
Cimager.gridder.AWProject.wmax                  = 1000
Cimager.gridder.AWProject.nwplanes              = 33
Cimager.gridder.AWProject.oversample            = 4
Cimager.gridder.AWProject.diameter              = 12m
Cimager.gridder.AWProject.blockage              = 2m
Cimager.gridder.AWProject.maxfeeds              = 36
Cimager.gridder.AWProject.maxsupport            = 512
Cimager.gridder.AWProject.variablesupport       = true
Cimager.gridder.AWProject.offsetsupport         = true
Cimager.gridder.AWProject.frequencydependent    = true
#
Cimager.solver                                  = Dirty
Cimager.solver.Dirty.tolerance                  = 0.1
Cimager.solver.Dirty.verbose                    = True
Cimager.ncycles                                 = 0

Cimager.preconditioner.Names                    = [Wiener, GaussianTaper]
Cimager.preconditioner.GaussianTaper            = [30arcsec, 30arcsec, 0deg]
Cimager.preconditioner.Wiener.robustness        = 0.0
Cimager.preconditioner.Wiener.taper             = 64
#
Cimager.restore                                 = true
Cimager.restore.beam                            = fit
Next create a file called dirty.sbatch, this is a description of the batch job that the system will execute:
#!/bin/bash -l
#SBATCH --ntasks=305
#SBATCH --ntasks-per-node=20
#SBATCH --time=02:00:00
#SBATCH --job-name=cimager
#SBATCH --export=NONE

aprun -n 305 -N 20 -ss cimager -c dirty.in > dirty_${SLURM_JOB_ID}.log
Before submitting the job for execution, lets dissect this file line by line. This line requests 305 MPI processes, which for the cimager results in one master process and 304 worker processes. Each worker process will process a single spectral channel from the measurement set:
#SBATCH --ntasks=305
Next –ntasks-per-node=20 indicates 20 processes should be launched on each node. The nodes in the system each have 20 CPU cores, so this results in an optimal assignment of one process per core. This job will then require 16 compute nodes.
#SBATCH --ntasks-per-node=20
The time limit is set to 2 hours, meaning if the job has not finished in 2 hours it will be killed. It is useful to set such a reasonable limit to ensure your job doesn’t run indefinitely (which can happen in the case of a bug or misconfiguration):
#SBATCH --time=02:00:00
The “–job-name” option sets the job name to cimager. This can be anything (there are some restrictions) and is used to identify your job in the list of all jobs running on the system:
#SBATCH --job-name=cimager
This final line actually executes the program. The aprun wrapper is used to execute all jobs on the Cray compute nodes. Here “-n 305” and “-N 20” repeat those numbers already described earlier. The “-ss” option specifies strict memory containment per NUMA node. This is just a performance optimisation and can be ignored for now. The cimager program is then executed by aprun with command line arguments “-c dirty.in” which specifies the configuration parameter set created above. Finally, the output is directed to a file named dirty_1234.log (where 1234 is the unique job ID). Without this redirection, the output will go to stdout and will only be written to disk once the job is complete. By redirecting the output to a file, the file can be inspected at run time to track progress:
aprun -n 305 -N 20 -ss cimager.sh -c dirty.in > dirty_${SLURM_JOB_ID}.log
Now this job can be submitted to the SLURM scheduling system for execution with the sbatch command like so:
sbatch dirty.sbatch
The sbatch program returns the Job ID of the created job (e.g. 1234) which you can then use to monitor the status of your job:
squeue -j 1234

JOBID     USER  ACCOUNT           NAME  ST REASON    START_TIME                TIME  TIME_LEFT NODES CPUS
1024   user123  astrono        cimager   R None      2014-05-21T10:00:27    2:00:00    2:00:00    16  320
Alternatively, you can use the command “squeue -u $USER” to list all of your incomplete jobs. You can also (once the job begins running) tail the file dirty_1234.log (where 1234 is your job id) to track its progress.
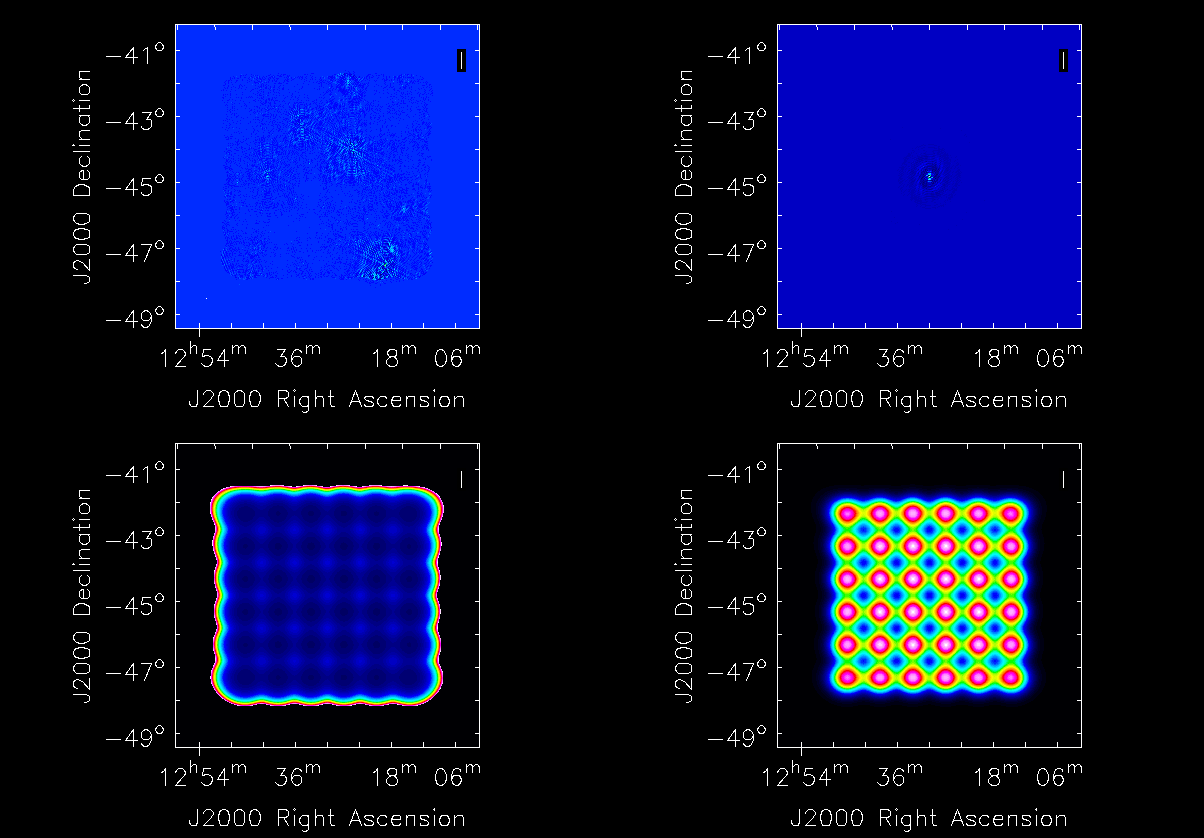
When the job completes it produces the following output files:
Filename |
Description |
|---|---|
image.i.dirty |
Ignore this image, it will be empty |
image.i.dirty.restored |
The dirty image |
psf.i.dirty |
PSF image |
sensitivity.i.dirty |
Sensitivity pattern image |
weights.i.dirty |
Weights image |
Visualising the Images
If you have CASA installed on your desktop computer you may download and visualise these images with casaviewer. First copy the file from the /scratch2 filesystem to your desktop computer:
scp -r hpc-data.pawsey.org.au:/scratch2/askap/<USERID>/introtutorial/image.i.dirty.restored .
scp -r hpc-data.pawsey.org.au:/scratch2/askap/<USERID>/introtutorial/psf.i.dirty .
scp -r hpc-data.pawsey.org.au:/scratch2/askap/<USERID>/introtutorial/sensitivity.i.dirty .
scp -r hpc-data.pawsey.org.au:/scratch2/askap/<USERID>/introtutorial/weights.i.dirty .
The string <USERID> needs to be replaced with your Pawsey userid. Alternatively, you may wish to use the BBCP program for faster data transfer if you have it installed:
bbcp -z -P 10 -s 16 -w 2M -r hpc-data1.pawsey.org.au:/scratch2/askap/<USERID>/introtutorial/image.i.dirty.restored .
bbcp -z -P 10 -s 16 -w 2M -r hpc-data1.pawsey.org.au:/scratch2/askap/<USERID>/introtutorial/psf.i.dirty .
bbcp -z -P 10 -s 16 -w 2M -r hpc-data1.pawsey.org.au:/scratch2/askap/<USERID>/introtutorial/sensitivity.i.dirty .
bbcp -z -P 10 -s 16 -w 2M -r hpc-data1.pawsey.org.au:/scratch2/askap/<USERID>/introtutorial/weights.i.dirty .
Note
The hostname necessary to use bbcp is hpc-data1.pawsey.org.au. This is one of the four hosts to which the hpc-data DNS alias points to (the other that works is hpc-data2). This is necessary as bbcp doesn’t reliably establish connections via the hpc-data alias due to the fact connections are round-robined between its four nodes.
Once the files have finished downloading, view the restored image with casaviewer:
casaviewer image.i.dirty.restored
You may need to adjust the data range so as to see the fainter sources:
Go to Data->Adjust… (or click the spanner icon in the toolbar)
User “basic settings” locate “data range”
Change the range to: [-0.5, 1.3]
Click apply
All four images are tiled and shown below - image.i.dirty.restored (top left), psf.i.dirty (top right), sensitivity.i.dirty (bottom left), weights.i.dirty (bottom right)