Visualisation and using CASA
While the ASKAP Central Processor was not specifically designed to run CASA, there are a number of approaches to using CASA. It can be run on the compute nodes, however there is no X-Windows system there, so GUI tools such as casaviewer, casabrowser & casaplotms will not work. We do have a number of (temporarily) “spare” nodes which we can temporarily dedicate to visualisation and CASA usage. These are Dell servers with 64GB RAM. However these nodes are part of the ingest pipeline infrastructure and will be dedicated to that purpose as more antennas come online.
The two nodes that have been earmarked for temporary CASA usage are galaxy-vis1 and galaxy-vis2. Two approaches to running CASA are described below: 1) using VNC and 2) using X11-Forwarding.
Warning
Neither casapy nor any of the CASA GUI tools (casaviewer, casabrowser, casaplotms) should be executed on the login nodes (galaxy-1 or galaxy-2). Using these tools often results in memory exhaustion and will hang the login nodes, preventing all users from accessing the system.
Running CASA via VNC
A remote desktop environment can be accessed via VNC. Either of the two visualisation servers can be used to host a VNC server. First you must login to one of the visualisation servers and start the VNC server:
ssh galaxy-vis1.pawsey.org.au
vncserver -geometry 1024x768 -depth 24
Note, you may choose any geometry you want, 1024x768 is just an example. You may wish to run the VNC session in full-screen mode, in which case the geometry should match your monitor. You will then be prompted to enter a password. Be sure to choose a secure password, as anyone within the Pawsey network can potentially connect to your VNC server. You will also be prompted to enter a view only password, you can answer no to this. You will then see output similar to the following:
New 'X' desktop is esDM015:1

Starting applications specified in /home/hum092/.vnc/xstartup
Log file is /home/hum092/.vnc/esDM015:1.log
Shortly you will be configuring your VNC client and you will need the number after the full-colon in the first line, in this case “1”. Now the VNC server is started and is waiting for your VNC client to connect. You are free to use the VNC client of your choice, however as you will be connecting via an SSH tunnel (the VNC port is blocked at the Pawsey firewall) you will want a client with SSH tunnelling support. On Mac OSX the VNC client “Chicken” works well.
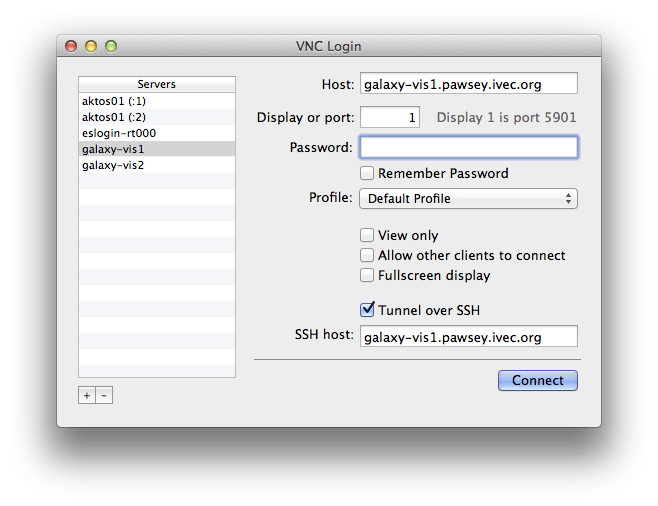
- Below is a screen shot of the VNC configuration. The settings you will need to enter are:
Host: - This is either galaxy-vis1.pawsey.org.au or galaxy-vis2 depending on which host you logged in to
Display or port - This is the number returned when executing the VNC server
Password - This is the password you entered when you started the VNC server
Tunnel over SSH - Tick this
SSH Host - This is the same as the Host field above
Once you connect with your VNC client you can start a terminal and launch CASA like with the following commands:
module load casa
casa
While you may wish to leave your session running for long periods of time, you should be sure to kill it when you are no longer using it. Each VNC sessions requires memory, and with many users it is possible to exhaust available memory. The VNC server can be killed with the following command:
vncserver -kill :1
Note the “1” should be replaced with the display number you recieved when executing the vncserver command.
Using the GNOME desktop manager
The default desktop manager, TWM, may be unfamiliar. You can use GNOME instead, which provides a more familiar windowing environment. To use GNOME:
Kill the VNC server you have started (ignore this step if you have not got a server currently running)
Edit the VNC xstartup file (~/.vnc/xstartup) to only contain the following:
#!/bin/sh
/usr/bin/gnome-session
Start the VNC server using the instructions described above.
Running interactive CASA with X11-Forwarding
The GUI tools can be used and will be displayed on your desktop via X11-Forwarding. This approach is better suited to local machines, and you will notice it is not particularly fast.
The following commands will launch CASA:
ssh -Y galaxy-vis1.pawsey.org.au
module load casa
casa
Note you can choose from galaxy-vis1 or galaxy-vis2. These nodes share the home directory with the Cray supercomputer itself and also mount the /group filesystem.
Running CASA on Compute Nodes
Note
CASA has not been well tested on the Cray platform, and indeed CASA is not designed to be run in a HPC environment.
An interactive CASA session can be run on a compute node using the salloc command to allocate a node for an interactive session:
salloc --nodes=1 --mem=64G
Upon invoking this command one of two things will happen:
You will immediately be allocated a node if one is available - In this case you will see a message “salloc: Granted job allocation 1234” and be presented with a prompt on the service node; or
If no nodes are available your request will be enqueued - In this case you will see a message “salloc: job 1234 queued and waiting for resources”. When a node becomes available you will be presented with a prompt on the service node
From here you can load the module for CASA and execute CASAPY:
module load casa
srun --export=ALL casa --nologger --log2term --nogui
Visualisation of images on Zeus
Pawsey provide facilities for remote visualisation that offer an alternative to using the galaxy-vis nodes. This uses a compute node on the zeus cluster, combined with TurboVNC and the Strudel client (developed by the MASSIVE team at Monash University), to provide very good graphical performance. Tests have shown that it is possible to animate through a very large (many tens of GB) spectral cube at quite fast frame rates.
Pawsey have a detailed set of instructions for getting set up. You will need to install both Strudel and TurboVNC on your local machine. Connecting this way starts a slurm job on the zeus cluster. Once you are set up and connected to your zeus session, you may want to use, say, casaviewer to view your image. In the terminal, do the following:
cd /path/to/my/image
module load virtualgl
module load casa
vglrun casaviewer myBigCube
You need the vglrun command to go before casaviewer. This makes use of the virtualGL library to use the accelerator hardware on the zeus nodes.