krot is a program to do volume rendering of a data cube. The difference with xray is that is has a somewhat different approach and that it has a very good shader not available in xray. Originally it was Tom's private program to test some shaders, but it developed into a 'real' program.
The normal way to start this program is with
krot.cm
krot.cm is a combination of two programs, krot and kubes. One can also use krot on its own, but only to write images to disk and look at these later. To know how to use the display of krot.cm read the doc on kubes. kubes can handle two data sets and this implies that one can look at the original data while also looking at the rendered images made by krot. (Note that krot sends the images to Set 2 in kubes, so other data sets should be loaded in kubes in Set 1)
Also note the Swap Set 1 - Set 2 button in kubes. This allows to 'store' an image/movie sent by krot in Set 1, make a second image/movie which krot sends to Set 2, and than look at the two using the facilities of kubes.
After loading the cube, you can select a sub-volume using the sliders low x, high x etc. When loading a large cube, it is a good idea to set the Skip option before actually loading the cube and use the Low clip and High clip fields (see below).
The cube can be rotated using the Rotate buttons. This rotates the cube over the angle specified by the Step slider around the axis of the Rotate button. The other way to rotate the cube is to specify the angles under which you want to see the cube using the Angle sliders and than click on Render.
The Movie buttons make a sequence of images. The number of images is set with the Movie size slider, while the angle over which the cube is rotated in the movie is set with movie range. If you select a range smaller than 360 degrees, the rock option (under Loop) in kubes is useful. To save a movie to disk, use Save movie.
One can set the range of values on which the rendering is done. The main application of this is to block out noise. The voxels that are rendered are the ones with values below Low clip and above High clip. Using these clips also has an effect on the speed of krot (because it does not render what it does not render....). To set these clips, click on the field and type a number (and do not hit return).
The minimum and maximum allow to clip the data in the opposite way of Low clip and High clip. If a voxel has a value larger than maximum, it is set to the value of maximum, and similarly for minimum. This allows to 'dim' very bright spots in the cube. The default for these fields are the min and max of the cube.
![]()
where k is the opacity and d the value of the voxel. The other option takes a constant opacities for all data values.
The opacities used by krot are set by the parameter
![]() .
Choosing the first option for deciding on the opacities
(i.e.
.
Choosing the first option for deciding on the opacities
(i.e. ![]() ), and using a small value for
), and using a small value for
![]() makes relatively low-level data already quite opaque, so this
will show the low-level emission of the data. Choosing a higher value
makes the low-level data transparent and hardly visible, so this can
be used to 'zoom in' on the brighter parts.
makes relatively low-level data already quite opaque, so this
will show the low-level emission of the data. Choosing a higher value
makes the low-level data transparent and hardly visible, so this can
be used to 'zoom in' on the brighter parts.
![]() can be set using the alfa slider or by selecting
Sqrt (
can be set using the alfa slider or by selecting
Sqrt (![]() ), Lin (
), Lin (![]() )
or Square (
)
or Square (![]() ).
).
The other option for the opacities is to use the same value for all
voxels. This is selected with Constant. The opacity used is
set with the alfa slider and the actual value is
![]() .
.
Intensity
This menu allows to choose two simple transformations of the values in
the cube. Selecting Sqrt will make krot do the
rendering on ![]() instead of d itself (where d is the
value of a voxel). This compresses the range of the data and is
sometimes useful if the dynamic range of the data is large (but see
also minimum and maximum). Selecting
Square will render d2 .
instead of d itself (where d is the
value of a voxel). This compresses the range of the data and is
sometimes useful if the dynamic range of the data is large (but see
also minimum and maximum). Selecting
Square will render d2 .
Expand factor
The default is that xray and krot make an image that has the same pixel size as the data. If these images are small compared to the display window, it will expand these images using pixel replication. Blocky images are the result. By setting the expand factor to something other than 1 will make xray and krot do the expansion (it does it always, not only for small images) using an anti-aliasing algorithm. These images look much smoother (and better). Note that using an Expand factor of eg. 5 can (and usually will) result in very large images or movies that become too large to be handled efficiently. I recommend an expand factor of 2.
One problem with volume rendering is that in order to see faint structures in the data cube, one has to set the opacities, intensity transformation and clips such that also the noise becomes bright. As a consequence, the emission is visible only through a thick fog of noise and this noise hides a lot of information.
One solution is to apply adaptive filtering to the data cube: the data is smoothed where the emission is faint and extended (or absent), while the data is left intact if it is stronger or more pointlike. There are several techniques to do this. At the moment two algorithms are implemented, but we are working on other filters.
The filters are based on work of J.-L. Starck, F. Murtagh and A. Bijaoui with a few extentions of our own. They consists of making a wavelet transform of each channel in the cube. This allows to consider the data locally at different resolutions and modify it such that the signal-to-noise is improved. For more information, have a look at Adaptive Filtering and Masking of HI Data Cubes, Tom Oosterloo, ESF workshop on Vision Modeling and Information Coding', Nice, 4-6 October 1995 Note that the wavelet transforms can be 3D and 2D (channel by channel).
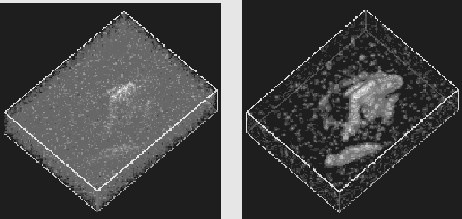
The figure below illustrates the effect of this adaptive filtering. Left is an unfiltered cube of NGC 4631 (data from R. Rand & J.M. van der Hulst, 1993, AJ, 105, 2098), right the cube filtered with the simple filter and rendered with exactly the same settings for opacity etc.
For an other example see example 2. The filters available are:
An important element of this filter is that it does a median filtering on the logical mask. This makes isolated noise peaks disappear and makes the data look more 'consistent'.
The difference between the fast and slow version of this filter is that in the fast version 2 iterations are done, compared to 6 iterations in the slow version. The fast filter still leaves some noise blobs in the data, but fewer than the simple filter. The slow filter gets rid of almost all of them.
There are two parameters to set for this filtering:
Specifying Levels to 0 the original unfiltered data cube is rendered, but with noise clipping applied.
To apply the filtering. click on Filter. The cube is rendered automatically.
To get back the original data without any filtering, click on reset
To see the effect of the filtering, one can do a rendering without filtering, and use the Swap Set 1 - Set 2 option in the display window to store this frame/movie. Next, filter the data and look at the difference using the blink display mode.